Showing posts with label Sewing. Show all posts

Tuesday, January 17, 2012

To Infinity and Beyond

     So many blogs recently have featured infinity scarfs.  There are knitted ones, ones made out of polar fleece, single loop ones, really wide ones - an almost infinite variety.  I ended up with a heavy knitted one at our work Yankee Swap and have been thinking a lighter less bulky one would be nice.  Yesterday at Joann's I spotted some lace remnants and a sort of low pile furry white knit and thought why not.  They were 70% off so for a few dollars and a couple of hours I now have two infinity scarfs.
     I used this tutorial from Sweet Verbena http://sweet-verbena.blogspot.com/2011/10/single-loop-lace-infinity-scarf.html as guidance.  Her scarf was only a single loop though and I knew I wanted mine longer.  I also didn't want it to be quite as wide.  So for length I just used the full width of the knit fabric - about 60 inches.  For width I made it 10 inches wide.  For everything else, I followed her directions and ended up with this.

The red lace is fairly open so a light of the white backing shows through but you can adjust the scarf to display either more or less of the red.
  The width and length are exactly what I was hoping.
  It does look a little Christmas y.  I wish had made it last month - it would be
a perfect accessory for the black sweater dress I wore to a holiday party.


However, I noticed that with the open work lace you could really see the messy inner seams if you looked closely.
  I started the Crafty Diane Rupp online sewing course a couple of weeks ago and learned how to make french seams.  This made me wonder if I could make a scarf with French Seams.
   My second piece of lace was not as long so I had to piece it together to get a 60 inch piece, but other than that I kept all the measurements the same.  Instead of doing the first seams right sides together I matched them up wrong sides together (or how the completed scarf would look).  I then sewed a quarter inch seam down both long sides in a medium zig zag stitch as the base fabric is knit.  Then I turned the scarf inside out and carefully sewed a second seam a little wider than a 1/4 inch making sure to roll the previous seam to the outside edge.
That way all the messiness was on the inside of the closed seam.  In retrospect it would have looked even better if I had used white thread in my bobbin but I was more concerned with matching the green lace.  I then turned the whole thing right side out again and sewed the short ends of the green lace together matching right side to right side.  Then you sort of turn it inside out again.  It doesn't need to be turned all the way - just enough so you can sew all but the last few inches of the right sides of the knit material together.  Then pull everything back through the gap, slip stitch the opening and voila! A very neat infinity scarf.
Because of the heavier lace this one has a more solid appearance.  I'm really pleased with both and wish I had tried this before the holidays.  These will make great gifts and I'm already mentally going through different fabric and color combinations
Despite the french seams the second scarf is the same width as the first because I used a narrower seam allowance.
A definite instant gratification project!

Sunday, January 8, 2012

Attempting to sew with knits


 Flush with the success of my lounging pants (which I have already worn several evenings) I decided to attempt a simple knit skirt.
  Leanne Barlow at http://elleapparel.blogspot.com/ always looks like a professional model in her homemade clothes so I decided to try one of her tutorials.  I had a cute cheap knit with strips so I thought I would make her Socialite Skirt.  It looks quick, simple and comfy.  The trouble began as soon as I tried to lay out the knit for cutting.  It took forever to get it lined up and flat.  I painstakingly matched up the strips but after cutting learned I was only semi successful.  It will be a while before I try something with tiny stripes again.  Then, I started to make the pleats.  The knit would not cooperate!  Finally I ironed on some interfacing to the top part and that helped with the pleats.  Bottom line  - a skirt I thought would take an hour or two took a half dozen and at the end I didn't even hem it because I was so frustrated.  Leanne's instructions were clear  - the issues were all created by me.
 So, one would think after that I would shy away from knits for at least 24 hours right?  Well, no.  I really need some shirts and I love cowl necks so I decided to make McCall's 6241 out of a black and white animal print.  Before I even cut it my husband said I would never wear it  - should have listened.  It cut easier and fitted easier than the other knit.  But, the semi finished top was HUGE!!  I went with my measurements but it would have fit someone 50 pounds bigger than me.  So I started trying to make it smaller.  Sadly I then wacked too much off the bottom.   To try to fix that I added a black band.  I took in the sides by an inch, cut off 6 inches in length from the sleeves and took them in an inch each too.  It is still big and now it just looks funny.  But, I still think this pattern has potential and might try again in a smaller size.  The knit worked better than the first one too.  If I hadn't damaged the bottom it might be wearable.
  The good news is that I'm half way through the Collette Meringue skirt and that is going MUCH better.  I hope to write about that later in the week.  I'm not counting the two above as finished because they aren't at this point.  Need to hem the sleeves on the black and white one and hem the bottom of the stripped one.  Not sure if it is worth the effort for either.
    Any tips for working with knits?  I could use them.

Sunday, January 1, 2012

Suprised Myself

    I actually did a complete sewing project today!  Unheard of.  A couple of months ago I found a piece of checked flannel in a thrift store for just a few dollars.  I knew immediately that I wanted to make them into comfy lounging pants (translation - pants only to be worn inside the house).  
     I choose McCall's 6252.  This morning I cut out a large which according to my measurements was what I needed.  I shortened the length of the pattern by four inches.  I had just the right amount of fabric, if I were a few inches taller it would not have been enough.  I got the length exactly right but they were huge in the waist, hip and leg.  I just sewed new side seams an inch in from the old ones and made the back crotch about a half inch smaller.  It took me about a total of four hours to make them but most of that was cutting the pattern and pieces and threading the elastic.  
  Terrible picture  - next time I'll get my husband to do the documenting.  
   I'll probably make these again but will cut down the pattern first.  Will also add pockets - that is all that is missing.  But for less than a day's work this was a great instant gratification project.  

Thursday, December 29, 2011

Looking Forward to 2012 Resolutions and Goals

    We are still a few days away from the official end of this year but I am ready to look forward and set my sights on 2012.

     Here are my goals/resolutions for the next year:
1.  Weigh less at the end of the year than at the beginning.
          I'm not going to share what I'm starting at but since 1/1/2010 when I first made this resolution I've lost and kept off about 35 pounds.  So slowly but surely I'm getting there and I am in MUCH better shape!
2.  I will complete at least two sewing projects a month.  Tentatively I'm hoping for one new and one old but I'll be happy if I just actually complete two.
3.  I will learn how to use a serger.  Got to have 1 easy goal.  ;)
4.  This year I will go to the gym or exercise for at least a half hour at least 4 x per week year round when I am home.
        The last two years I went on hiatus for the summer and had to work hard to get back to where I was.
5.  I will spend at least 15 - 30 minutes a day doing some sort of cleaning type activity.

      My plan is to set up some sort of side bar to track my success with these.
   
      This afternoon DH and DS are going to be taking the carpet out of my sewing room and doing some furniture rearranging.  I need to go clear away some of the clutter so they can get started.
       Cheers!


Wednesday, December 28, 2011

Looking Backward

Where did November and December go?!!
What was I thinking when I started a blog so close to Christmas?  And, what was I thinking when I set a goal of 14 hours/week for the month of November?  Sigh, so naive and optimistic.

I will do better going forward but today's post is about looking backward over the past year.
I started the year with a few resolutions.  I only remember two of them.  Again, deep sigh.

I achieved one of them - I weigh less at the end of the year than I did at the beginning.  Even that had its ups and downs (pun intended).  Last spring I did a great job exercising and eating right.  I stayed on track with Weight watchers and by the end of May I was 20 lbs less than January 1st and only 10 pounds away from my goal.  Then, I stopped cold - not going to the gym and not doing weight watchers.  Interestingly thanks to being outside a lot I maintained for the whole summer.  Then, starting Labor Day weekend I lost control.  Gradually over the fall I put 10 pounds back on.  I started going to the gym again but not often enough.  So, while I still weigh 10 pounds less than in January 2011, it could have been better.

The other goal I remember was sewing related.  I wanted to finish 4 projects a month.  I hoped that this way I would work my way through my vast inventory of UFO's.  While I didn't not complete 48 projects I did complete quite a few both new and old.


 These are just a few of the completed items.  So I have to feel pretty good about my success rate.  Especially as some of the items had been unfinished literally for years.  Some were new - I am proud of figuring out how to sew clothes.
Obviously, from the poorly arranged grouping of photos I have not figured out how to use blogger properly yet.

Later I will look forward and set my goals for 2012.


Sunday, November 13, 2011

Pillows!

   I just posted a 9 patch pillow tutorial on the Crafty Christmas Club.  Sewing the pillows was a fun way to spend the morning.

    I articulated a goal of 2 hours/ day sewing in November.  Massive fail for last week!  Probably did a total of 5 hours for the week, a far cry from 14.  Will do better this week and will hopefully have stuff to share.

Sunday, November 6, 2011

A Quilter's Gathering

  Every year for the past 5 years my Mom and I have met in Nashua and attended A Quilter's Gathering.  If you live in New England and enjoy quilting or looking at quilts this is a great conference to go to.  Everyone is SO friendly and the teachers are top notch and it is very reasonably priced.  If you don't want to take a class just go and admire the lovely quilts in the exhibit and shop the many vendors.
  We took two all day classes. We've taken all sorts here - fabric painting, embellishments, machine quilting, pictorial, design -  you name it.  This year we went for traditional.  I lean more towards modern quilting or art quilting but Mom is a scientist by nature and likes the precision of the traditional styles more.  Both of the classes we took this year were with long-time experts in the fields of machine applique and machine free motion quilting.  Interestingly their class topics over the three days were fairly similar but their styles very different.
    Our first class was with Sue Nickels on Feathers and Machine Quilting.  We both want to be more comfortable with free motion quilting.  We spent our day practicing stitching different quilting stitches:
 And then feathers:
And then combining the two:
  She gave us all sorts of tips and good takeaways.  I was very pleased and surprised with how small I could stipple.  The best tip though was using the cut-off fingers of dish gloves on your first two fingers to manipulate the quilt.  Loved it!  This could have easily been a two day class - at the end of the day I just wanted to keep on sewing.
   Yesterday's class was with Harriet Hargrave.  People wait for years to get into one of her classes - we got in on our first try.  This class was on invisible machine applique.  We spent the morning preparing the applique and prepping for sewing.  The first part of the afternoon was balancing the tension and practicing staying on the edge with the tiny tiny stitches we needed to use.  Then we stitched.
  Here is my flower and a leaf close up:

  You can't see stitches.
  I have to admit that normally I use fusible applique - quicker and less fussy but it was good to learn a new technique and to better understand how to manipulate my sewing machine.  And, the opportunity to learn from a master was too good to pass up.  I will finish this block and will try at least a few more so I solidly know how to use this method in the future.
    Mom and I had a good two days together learning and sewing.  We saw some amazing quilts and spent too much money with the vendors.  Next year A Quilters Gathering will be moving to Manchester, NH. and we will be there!

Wednesday, October 26, 2011

Resolution

   Over the past few years I have become better at setting and achieving goals.  It helps me stay focused.  They don't have to be big goals in fact, most are relatively easy to achieve but it still makes me feel good to accomplish them.  For instance, two years ago I was fifty pounds overweight.  I've been overweight at least thirty pound since my son was born but the additional twenty crept on and was slowly increasing.  So, my goal in January 2010 was to end the year weighing less than I started it.  Nothing dramatic but something to keep me motivated to exercise and think about what I was eating.  In January 2011 I weighed 25 pounds less thanks to that goal, regular gym attendance and weight watchers.  I set the same goal again for this year.  After a strong start (another 17 pounds lost),  I've been struggling this fall and put some back on but am still smaller than in January and I am determined not to finish the year heavier.
    So, part of my motivation for starting this blog is to help me be publicly accountable for the things I want to do but might let myself slack off on or give up on.  Granted, I don't think anyone is reading this (dare I say yet?) but even so I'm putting a goal out there for the world to see.
     My goal for the month of November is to sew an average of two hours a day for fourteen hours a week.  It is not a huge goal but I'm hoping it will help me actually finish some of my started projects and the Christmas presents I want to make.  I'm kind of cheating by taking next week as vacation but the fourteen hours will reset each week.  I will post on here my finished items and the hours I spent working on them.

Friday, October 21, 2011

Snap Happy II bag

    I seem to be on a bag making kick these days.  My most recent one is the Snap Happy Bag.
There are quite a few steps to making this bag including finding a measuring tape that you can cut up without incurring the wrath of any other household members.  It took me almost 2 hours to cut the pieces I needed and to prepare the bag for assembly.  It would probably take you less time - it took me some time to quilt quasi-straight lines on the main fabric.  Next time I will definitely free-motion quilt the outside.
       Note the cut up tape measure.  And the wobbly quilting lines.
   The actual assembly went together fairly fast.  What I liked is that you sew in the lining with French seams.  I had never seen this done in a purse pattern and I really enjoy the neat insides it produces.
    Here is the bag before the bottom is added.  Looks a little out of proportion.
  But, after the bottom gets fixed - perfect.
  I like this bag - it keeps things inside and is fun.  The instructions could be a bit more detailed - this might not be the best choice for a beginning sewer but the end result is sharp looking.  I liked that I learned a new technique (french seams on a purse) and the use of the measuring tape is clever.
  When I showed this to my DH his first comment was "What tape measure did you use?"  Fortunately I could truthfully say I bought one.  Of course, many of my scissors end up on his work bench...

Sunday, October 16, 2011

      This was quite a busy weekend!  Lots to do.
      Earlier this week I downloaded a cute clutch pattern from http://www.keykaloupatterns.com .  It was $6 and I thought it might make a cute gift for a co-worker or friend.  I cut out the fabrics on Wednesday night, spent a little time sewing it on Friday night and finished it off on Saturday.  I'm pleased with how it turned out!

Especially pleased with how the strips pretty much match up even if the colors are off!

Note that the clutch has two pockets and a snap closure - the button is optional and just for show.
The instructions on this pattern (http://www.keykaloupatterns.com/product/pocket-clutch-pdf-sewing-pattern) are extremely well-written and very clear.  Sewing is not intuitive for me and I get confused easily ;) that didn't happen with this pattern. It also uses very little fabric and would be a good way to use up some leftovers from other projects.  It calls for a 1/4 yard of both the focus and lining fabrics but actually used closer to an 1/8th of each and there is no reason why different fabrics couldn't be used for the pockets.  I would have liked if it were a tad bigger (I need to fit an epi pen in my bags) but the size was stated on the pattern so that is my own fault.  I might try increasing the size by 20% when I make it again.  In total, including the cutting this took me about 21/2 hours to make and was very satisfying!  Would recommend it.

Tuesday, October 11, 2011

Highly Unusual

     In a very unusual event for me I actually finished a second sewing project yesterday.  Was it one of my several partially finished clothing projects?  No.  Instead I went for instant gratification and made this cute litle purse from http://mommybydaycrafterbynight.blogspot.com/2011/10/pleated-purse-tutorial.html .
This is smallish bag (about 8 X 7) with a pleated front.  There are no pockets on the inside but if I make it again I will add them and some sort of closure.  It probably took me just over two hours including cutting.  The hardest part was the pleats on the front and the back.  I think it might have been faster if I had done them correctly and measured them out first.  Instead I took the "shortcut" and eyeballed them.  They aren't perfect but the lining hides most of the irregularities.  This was a fun quick project and would be cute for a little girl.

Monday, October 10, 2011

Sewing Project Completed


When I was a young I used to go to the Fabric Place in Framingham with my mother to pick out yarn and fabric for her projects. Later I would go for myself to pick out quilting fabric. It was a big two story store with all sorts of different kinds of fabric and yarn. The staff was knowledgeable and I never walked out empty handed. A few years ago they closed leaving a gaping hole for New England sewers. Last Wednesday it reopened in a basement in a strip mall in Natick. I went on day two (showing remarkable restraint). All the fabric isn't out yet and they are still working out some kinks as far as how to use the register but I spent 45 minutes wandering around and stroking fabric. I bought some needles for my upcoming class at the Quilter's Gathering, some brown knit jersey and a See & Sew sweater pattern B5666.
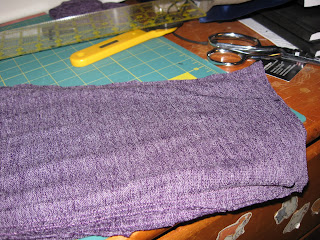
Then, on the way home I stopped by Joann's and found a beautiful purple heather sweater knit to use in the pattern.
I cut it out Friday morning and worked on it for a while on Saturday and Sunday. I am a slow sewer and it took about 3 hours to sew it all. Last night when all put together it looked like this.
Even though I had shortened the pattern by two inches it was REALLY long and the sleeves were long and wide. Not something I would ever wear.
So I started with the sleeves. I cut of two inches and then went up six inches and drew a line tapering from the back seam to the cuff about an inch and a half in.
I then made a french seam and cut off the excess and the sleeves fit much better (at least at the bottom).
I then cut 3 1/2 inches off all the way around the bottom of the sweater and hemmed. At the end it looked like this.
It is still not perfect but I will wear it like this. If I make this again I will make the arm holes and the tops of the sleeves smaller. This is an easy to sew pattern where mistakes are easy to hide. ;)