I just posted a 9 patch pillow tutorial on the Crafty Christmas Club. Sewing the pillows was a fun way to spend the morning.
I articulated a goal of 2 hours/ day sewing in November. Massive fail for last week! Probably did a total of 5 hours for the week, a far cry from 14. Will do better this week and will hopefully have stuff to share.
Sunday, November 13, 2011
Sunday, November 6, 2011
A Quilter's Gathering
Every year for the past 5 years my Mom and I have met in Nashua and attended A Quilter's Gathering. If you live in New England and enjoy quilting or looking at quilts this is a great conference to go to. Everyone is SO friendly and the teachers are top notch and it is very reasonably priced. If you don't want to take a class just go and admire the lovely quilts in the exhibit and shop the many vendors.
We took two all day classes. We've taken all sorts here - fabric painting, embellishments, machine quilting, pictorial, design - you name it. This year we went for traditional. I lean more towards modern quilting or art quilting but Mom is a scientist by nature and likes the precision of the traditional styles more. Both of the classes we took this year were with long-time experts in the fields of machine applique and machine free motion quilting. Interestingly their class topics over the three days were fairly similar but their styles very different.
Our first class was with Sue Nickels on Feathers and Machine Quilting. We both want to be more comfortable with free motion quilting. We spent our day practicing stitching different quilting stitches:

 And then feathers:
 And then combining the two:
 She gave us all sorts of tips and good takeaways. I was very pleased and surprised with how small I could stipple. The best tip though was using the cut-off fingers of dish gloves on your first two fingers to manipulate the quilt. Loved it! This could have easily been a two day class - at the end of the day I just wanted to keep on sewing.
Yesterday's class was with Harriet Hargrave. People wait for years to get into one of her classes - we got in on our first try. This class was on invisible machine applique. We spent the morning preparing the applique and prepping for sewing. The first part of the afternoon was balancing the tension and practicing staying on the edge with the tiny tiny stitches we needed to use. Then we stitched.
Here is my flower and a leaf close up:

 You can't see stitches.
I have to admit that normally I use fusible applique - quicker and less fussy but it was good to learn a new technique and to better understand how to manipulate my sewing machine. And, the opportunity to learn from a master was too good to pass up. I will finish this block and will try at least a few more so I solidly know how to use this method in the future.
Mom and I had a good two days together learning and sewing. We saw some amazing quilts and spent too much money with the vendors. Next year A Quilters Gathering will be moving to Manchester, NH. and we will be there!
We took two all day classes. We've taken all sorts here - fabric painting, embellishments, machine quilting, pictorial, design - you name it. This year we went for traditional. I lean more towards modern quilting or art quilting but Mom is a scientist by nature and likes the precision of the traditional styles more. Both of the classes we took this year were with long-time experts in the fields of machine applique and machine free motion quilting. Interestingly their class topics over the three days were fairly similar but their styles very different.
Our first class was with Sue Nickels on Feathers and Machine Quilting. We both want to be more comfortable with free motion quilting. We spent our day practicing stitching different quilting stitches:


Yesterday's class was with Harriet Hargrave. People wait for years to get into one of her classes - we got in on our first try. This class was on invisible machine applique. We spent the morning preparing the applique and prepping for sewing. The first part of the afternoon was balancing the tension and practicing staying on the edge with the tiny tiny stitches we needed to use. Then we stitched.
Here is my flower and a leaf close up:


I have to admit that normally I use fusible applique - quicker and less fussy but it was good to learn a new technique and to better understand how to manipulate my sewing machine. And, the opportunity to learn from a master was too good to pass up. I will finish this block and will try at least a few more so I solidly know how to use this method in the future.
Mom and I had a good two days together learning and sewing. We saw some amazing quilts and spent too much money with the vendors. Next year A Quilters Gathering will be moving to Manchester, NH. and we will be there!
Thursday, November 3, 2011
Positively Addictive!

Wednesday, November 2, 2011
New Glue Gun!
I bought a glue gun. It might not have been the wisest of decisions but so far I'm having fun and have learned a few lessons.
A couple of weeks ago I scored about 3 yards of some pleated rainbow ribbon in a yard sale for a dollar. I wasn't sure what to do with it but knew I could think of something. While perusing crafting blogs I've seen several posts about quick and easy homemade headbands. A little bulb went off and I headed to Joann's, 40% coupon in hand. Then I went to Walmart for some cheap fabric covered headbands. Two hours after the idea I had results - nothing like instant gratification:

The head bands were fairly easy but for me a little messy. So I thought I would share some lessons learned:
1) glue guns are HOT!
2) hot glue will hurt your finger tips
3) glue sticks when hot - everywhere and everything it touches
4) cover the surface that you are working on unless you want to scrap glue off of it. (See example of an uncovered ironing board)
 But I would call the experiment a success. I just folded over the ends and glue them down on the inside to keep from unraveling and carefully did a thin strip of glue a couple of inches at a time and centered the ribbon. Just go slow. The clean-up took longer than the head bands and I have lots of ideas for variations to try.
I thought I had a brilliant idea to keep embroidered ribbon from unraveling but it failed.

 I thought if I glued it to fabric and then cut the fabric out the threads would stay contained. But it was too difficult to not cut into the ribbon and the threads still came out. Any ideas? I think a ladybug headband would be darling.
A couple of weeks ago I scored about 3 yards of some pleated rainbow ribbon in a yard sale for a dollar. I wasn't sure what to do with it but knew I could think of something. While perusing crafting blogs I've seen several posts about quick and easy homemade headbands. A little bulb went off and I headed to Joann's, 40% coupon in hand. Then I went to Walmart for some cheap fabric covered headbands. Two hours after the idea I had results - nothing like instant gratification:

The head bands were fairly easy but for me a little messy. So I thought I would share some lessons learned:
1) glue guns are HOT!
2) hot glue will hurt your finger tips
3) glue sticks when hot - everywhere and everything it touches
4) cover the surface that you are working on unless you want to scrap glue off of it. (See example of an uncovered ironing board)

I thought I had a brilliant idea to keep embroidered ribbon from unraveling but it failed.


Wednesday, October 26, 2011
Resolution
Over the past few years I have become better at setting and achieving goals. It helps me stay focused. They don't have to be big goals in fact, most are relatively easy to achieve but it still makes me feel good to accomplish them. For instance, two years ago I was fifty pounds overweight. I've been overweight at least thirty pound since my son was born but the additional twenty crept on and was slowly increasing. So, my goal in January 2010 was to end the year weighing less than I started it. Nothing dramatic but something to keep me motivated to exercise and think about what I was eating. In January 2011 I weighed 25 pounds less thanks to that goal, regular gym attendance and weight watchers. I set the same goal again for this year. After a strong start (another 17 pounds lost), I've been struggling this fall and put some back on but am still smaller than in January and I am determined not to finish the year heavier.
So, part of my motivation for starting this blog is to help me be publicly accountable for the things I want to do but might let myself slack off on or give up on. Granted, I don't think anyone is reading this (dare I say yet?) but even so I'm putting a goal out there for the world to see.
My goal for the month of November is to sew an average of two hours a day for fourteen hours a week. It is not a huge goal but I'm hoping it will help me actually finish some of my started projects and the Christmas presents I want to make. I'm kind of cheating by taking next week as vacation but the fourteen hours will reset each week. I will post on here my finished items and the hours I spent working on them.
Tuesday, October 25, 2011
Homemade Vanilla
Two of my proposed food gifts both take more time than effort. And by time I mean time sitting and developing flavor time not labor time.
This weekend I started a quart of homemade vanilla. This was actually a little late to start on it as vanilla should sit for at least two months prior to using. It only takes two ingredients: vanilla beans and vodka. I read lots off different homemade vanilla recipes on the web. Some of the sites I read were: http://hitchhikingtoheaven.com/2011/10/homemade-vanilla-extract-day-one.html , http://heavenlyhomemakers.com/making-homemade-vanilla-extract-aka-why-laura-bought-a-gallon-of-vodka , http://www.thesimpledollar.com/2010/09/17/homemade-gift-series-1-vanilla-extract/, and http://simplyrecipes.com/recipes/how_to_make_vanilla_extract/ . There are a lot of others too! Am I the last person to try this? This is why I love the web - you have an idea or a need and almost always there is something online to help.
The problem is that each site has a slightly different recipe. I ended up taking the middle road as far as ratio of beans to vodka. I used two kinds of beans: Tahitian and Planifolia. I ordered these online last week and a total of a half a pound was under $30.00. A half a pound is a lot of beans!!
The steps are easy. Slice almost to the top of each vanilla bean.


I put four of each type of bean in each jar for a total of eight per pint. After a few minutes the vodka was already starting to darken.

I also started homemade limoncello last week but will wait to talk more about that til after the second step next weekend.

Friday, October 21, 2011
Snap Happy II bag
I seem to be on a bag making kick these days. My most recent one is the Snap Happy Bag.
There are quite a few steps to making this bag including finding a measuring tape that you can cut up without incurring the wrath of any other household members. It took me almost 2 hours to cut the pieces I needed and to prepare the bag for assembly. It would probably take you less time - it took me some time to quilt quasi-straight lines on the main fabric. Next time I will definitely free-motion quilt the outside.
 Note the cut up tape measure. And the wobbly quilting lines.
 The actual assembly went together fairly fast. What I liked is that you sew in the lining with French seams. I had never seen this done in a purse pattern and I really enjoy the neat insides it produces.
Here is the bag before the bottom is added. Looks a little out of proportion.
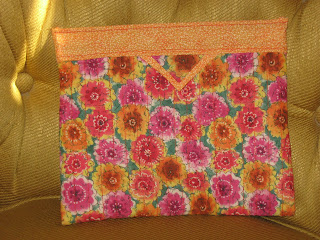 But, after the bottom gets fixed - perfect.
 I like this bag - it keeps things inside and is fun. The instructions could be a bit more detailed - this might not be the best choice for a beginning sewer but the end result is sharp looking. I liked that I learned a new technique (french seams on a purse) and the use of the measuring tape is clever.
When I showed this to my DH his first comment was "What tape measure did you use?" Fortunately I could truthfully say I bought one. Of course, many of my scissors end up on his work bench...
There are quite a few steps to making this bag including finding a measuring tape that you can cut up without incurring the wrath of any other household members. It took me almost 2 hours to cut the pieces I needed and to prepare the bag for assembly. It would probably take you less time - it took me some time to quilt quasi-straight lines on the main fabric. Next time I will definitely free-motion quilt the outside.


Here is the bag before the bottom is added. Looks a little out of proportion.


When I showed this to my DH his first comment was "What tape measure did you use?" Fortunately I could truthfully say I bought one. Of course, many of my scissors end up on his work bench...
Subscribe to:
Posts (Atom)