Over the past few years I have become better at setting and achieving goals. It helps me stay focused. They don't have to be big goals in fact, most are relatively easy to achieve but it still makes me feel good to accomplish them. For instance, two years ago I was fifty pounds overweight. I've been overweight at least thirty pound since my son was born but the additional twenty crept on and was slowly increasing. So, my goal in January 2010 was to end the year weighing less than I started it. Nothing dramatic but something to keep me motivated to exercise and think about what I was eating. In January 2011 I weighed 25 pounds less thanks to that goal, regular gym attendance and weight watchers. I set the same goal again for this year. After a strong start (another 17 pounds lost), I've been struggling this fall and put some back on but am still smaller than in January and I am determined not to finish the year heavier.
So, part of my motivation for starting this blog is to help me be publicly accountable for the things I want to do but might let myself slack off on or give up on. Granted, I don't think anyone is reading this (dare I say yet?) but even so I'm putting a goal out there for the world to see.
My goal for the month of November is to sew an average of two hours a day for fourteen hours a week. It is not a huge goal but I'm hoping it will help me actually finish some of my started projects and the Christmas presents I want to make. I'm kind of cheating by taking next week as vacation but the fourteen hours will reset each week. I will post on here my finished items and the hours I spent working on them.
Wednesday, October 26, 2011
Tuesday, October 25, 2011
Homemade Vanilla
Two of my proposed food gifts both take more time than effort. And by time I mean time sitting and developing flavor time not labor time.
This weekend I started a quart of homemade vanilla. This was actually a little late to start on it as vanilla should sit for at least two months prior to using. It only takes two ingredients: vanilla beans and vodka. I read lots off different homemade vanilla recipes on the web. Some of the sites I read were: http://hitchhikingtoheaven.com/2011/10/homemade-vanilla-extract-day-one.html , http://heavenlyhomemakers.com/making-homemade-vanilla-extract-aka-why-laura-bought-a-gallon-of-vodka , http://www.thesimpledollar.com/2010/09/17/homemade-gift-series-1-vanilla-extract/, and http://simplyrecipes.com/recipes/how_to_make_vanilla_extract/ . There are a lot of others too! Am I the last person to try this? This is why I love the web - you have an idea or a need and almost always there is something online to help.
The problem is that each site has a slightly different recipe. I ended up taking the middle road as far as ratio of beans to vodka. I used two kinds of beans: Tahitian and Planifolia. I ordered these online last week and a total of a half a pound was under $30.00. A half a pound is a lot of beans!!
The steps are easy. Slice almost to the top of each vanilla bean.


I put four of each type of bean in each jar for a total of eight per pint. After a few minutes the vodka was already starting to darken.

I also started homemade limoncello last week but will wait to talk more about that til after the second step next weekend.

Friday, October 21, 2011
Snap Happy II bag
I seem to be on a bag making kick these days. My most recent one is the Snap Happy Bag.
There are quite a few steps to making this bag including finding a measuring tape that you can cut up without incurring the wrath of any other household members. It took me almost 2 hours to cut the pieces I needed and to prepare the bag for assembly. It would probably take you less time - it took me some time to quilt quasi-straight lines on the main fabric. Next time I will definitely free-motion quilt the outside.
 Note the cut up tape measure. And the wobbly quilting lines.
 The actual assembly went together fairly fast. What I liked is that you sew in the lining with French seams. I had never seen this done in a purse pattern and I really enjoy the neat insides it produces.
Here is the bag before the bottom is added. Looks a little out of proportion.
 But, after the bottom gets fixed - perfect.
 I like this bag - it keeps things inside and is fun. The instructions could be a bit more detailed - this might not be the best choice for a beginning sewer but the end result is sharp looking. I liked that I learned a new technique (french seams on a purse) and the use of the measuring tape is clever.
When I showed this to my DH his first comment was "What tape measure did you use?" Fortunately I could truthfully say I bought one. Of course, many of my scissors end up on his work bench...
There are quite a few steps to making this bag including finding a measuring tape that you can cut up without incurring the wrath of any other household members. It took me almost 2 hours to cut the pieces I needed and to prepare the bag for assembly. It would probably take you less time - it took me some time to quilt quasi-straight lines on the main fabric. Next time I will definitely free-motion quilt the outside.


Here is the bag before the bottom is added. Looks a little out of proportion.


When I showed this to my DH his first comment was "What tape measure did you use?" Fortunately I could truthfully say I bought one. Of course, many of my scissors end up on his work bench...
Monday, October 17, 2011
Pear Vanilla Jam
Another project this weekend was to make pear vanilla jam from the recipe on foodinjars.com. I've made a few of her recipes since the summer and I'm trying to get a small stockpile so I can use some jars for holiday gifts. However, what I've made so far is so good that our jam consumption has greatly increased.
What I love about the foodinjars site aside from the great tasting recipes is that the recipes are for small batches. Most can be completed start to finish in less than 2 hours and can be accomplished without any pricey equipment (although I do have a pressure cooker on my amazon wish list).
This recipe appealed to me because it uses real vanilla beans. Yum. To make it you chop up pears, scrape out the insides of two vanilla beans, and put it all in a non-reactive pot with lots of sugar. That is it. The only other ingredient is pectin. It looked like this as the sugar started dissolving. See the clumps of vanilla paste.
 After it cooks down til the pears are tender, take out the empty pods and mash up most of the pears with either a masher or an immersion blender.

What I love about the foodinjars site aside from the great tasting recipes is that the recipes are for small batches. Most can be completed start to finish in less than 2 hours and can be accomplished without any pricey equipment (although I do have a pressure cooker on my amazon wish list).
This recipe appealed to me because it uses real vanilla beans. Yum. To make it you chop up pears, scrape out the insides of two vanilla beans, and put it all in a non-reactive pot with lots of sugar. That is it. The only other ingredient is pectin. It looked like this as the sugar started dissolving. See the clumps of vanilla paste.


The black specks around the edges are vanilla. I kept trying to scrape them back in but couldn't get all of them. I scooped the jam out into jars, processed them for 10 minutes and only an hour and a half after starting had 3 pints (1 big and 4 little) jars of pear vanilla jam. Please go to foodinjars.com for the recipe.
But, the critical takeaway here is that canning doesn't have to be complicated or scary. With just a little time and regular cooking equipment (aside from the jars) you can preserve fruit easily.
Sunday, October 16, 2011
This was quite a busy weekend! Lots to do.
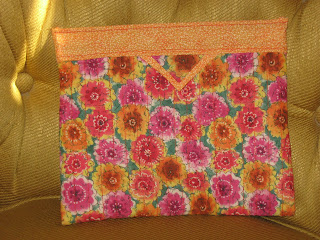
Earlier this week I downloaded a cute clutch pattern from http://www.keykaloupatterns.com . It was $6 and I thought it might make a cute gift for a co-worker or friend. I cut out the fabrics on Wednesday night, spent a little time sewing it on Friday night and finished it off on Saturday. I'm pleased with how it turned out!

Especially pleased with how the strips pretty much match up even if the colors are off!
 Note that the clutch has two pockets and a snap closure - the button is optional and just for show.
The instructions on this pattern (http://www.keykaloupatterns.com/product/pocket-clutch-pdf-sewing-pattern) are extremely well-written and very clear. Sewing is not intuitive for me and I get confused easily ;) that didn't happen with this pattern. It also uses very little fabric and would be a good way to use up some leftovers from other projects. It calls for a 1/4 yard of both the focus and lining fabrics but actually used closer to an 1/8th of each and there is no reason why different fabrics couldn't be used for the pockets. I would have liked if it were a tad bigger (I need to fit an epi pen in my bags) but the size was stated on the pattern so that is my own fault. I might try increasing the size by 20% when I make it again. In total, including the cutting this took me about 21/2 hours to make and was very satisfying! Would recommend it.
Earlier this week I downloaded a cute clutch pattern from http://www.keykaloupatterns.com . It was $6 and I thought it might make a cute gift for a co-worker or friend. I cut out the fabrics on Wednesday night, spent a little time sewing it on Friday night and finished it off on Saturday. I'm pleased with how it turned out!

Especially pleased with how the strips pretty much match up even if the colors are off!

The instructions on this pattern (http://www.keykaloupatterns.com/product/pocket-clutch-pdf-sewing-pattern) are extremely well-written and very clear. Sewing is not intuitive for me and I get confused easily ;) that didn't happen with this pattern. It also uses very little fabric and would be a good way to use up some leftovers from other projects. It calls for a 1/4 yard of both the focus and lining fabrics but actually used closer to an 1/8th of each and there is no reason why different fabrics couldn't be used for the pockets. I would have liked if it were a tad bigger (I need to fit an epi pen in my bags) but the size was stated on the pattern so that is my own fault. I might try increasing the size by 20% when I make it again. In total, including the cutting this took me about 21/2 hours to make and was very satisfying! Would recommend it.
Tuesday, October 11, 2011
Highly Unusual
In a very unusual event for me I actually finished a second sewing project yesterday. Was it one of my several partially finished clothing projects? No. Instead I went for instant gratification and made this cute litle purse from http://mommybydaycrafterbynight.blogspot.com/2011/10/pleated-purse-tutorial.html .
 This is smallish bag (about 8 X 7) with a pleated front. There are no pockets on the inside but if I make it again I will add them and some sort of closure. It probably took me just over two hours including cutting. The hardest part was the pleats on the front and the back. I think it might have been faster if I had done them correctly and measured them out first. Instead I took the "shortcut" and eyeballed them. They aren't perfect but the lining hides most of the irregularities. This was a fun quick project and would be cute for a little girl.

Monday, October 10, 2011
Sewing Project Completed
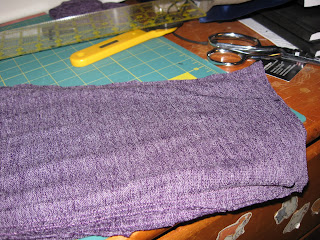
Then, on the way home I stopped by Joann's and found a beautiful purple heather sweater knit to use in the pattern.
I cut it out Friday morning and worked on it for a while on Saturday and Sunday. I am a slow sewer and it took about 3 hours to sew it all. Last night when all put together it looked like this.

Even though I had shortened the pattern by two inches it was REALLY long and the sleeves were long and wide. Not something I would ever wear.
So I started with the sleeves. I cut of two inches and then went up six inches and drew a line tapering from the back seam to the cuff about an inch and a half in.
I then made a french seam and cut off the excess and the sleeves fit much better (at least at the bottom).
I then cut 3 1/2 inches off all the way around the bottom of the sweater and hemmed. At the end it looked like this.

It is still not perfect but I will wear it like this. If I make this again I will make the arm holes and the tops of the sleeves smaller. This is an easy to sew pattern where mistakes are easy to hide. ;)
Sunday, October 9, 2011
Could Not Ask for a More Beautiful Day
This morning at 8:30am DH and I were here:

This afternoon I started cleaning up the vegetable garden for winter. I harvested more than I expected, including two tomatoes.

I think that I will roast the poblano peppers, mini peppers and tomatoes and do some kind of sauce for pasta for my dinner tonight with the chard.

Those tiny red peppers are tobasco peppers. We have quite a few and I have no idea what to do with them. Maybe dry them? I'll figure something out.
I pulled up all of the remaining plants except for the herbs and a couple of chard. Hopefully tomorrow I will get the rest of the garden cleared out and maybe even rototill it. Now to get back out and tackle some of winter preparation that needs to be done in the flower gardens out front.
Subscribe to:
Posts (Atom)